C# MVC
MVC (for .Net framework)
Web site development using Model, View and Controller.
To start your .Net framework MVC project, look for a project name of "ASP.NET Web
Application (.Net Framework)". Then select MVC and accept the defaults unless you
require authentication.
Model
This is for declaring the classes used for the views. For example, lets have a car class.
    public class Car
    {
        public string make { get; set; }
        public string model { get; set; }
        public bool emissionFree { get; set; } = false;
        public bool favourite { get; set; } = false;
    }
Now we can use this for a view.
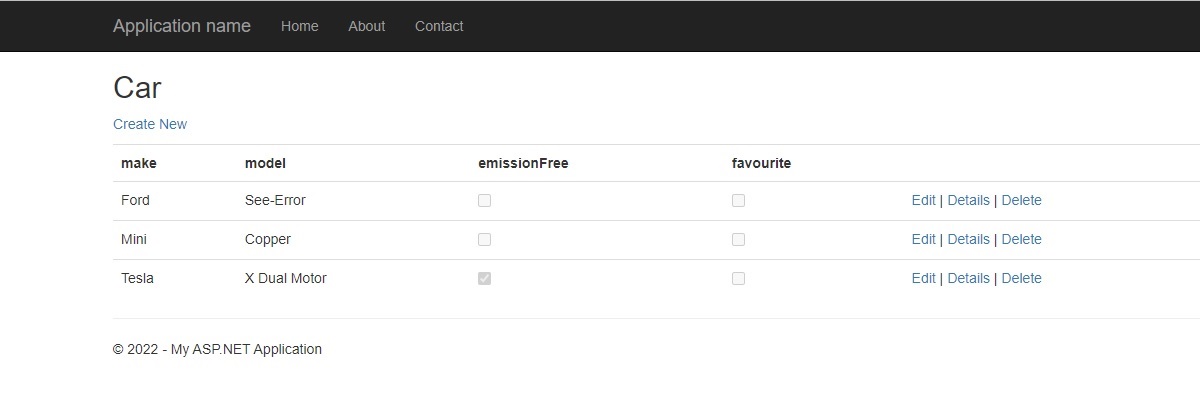
So lets try it and see what it look like.
See this code in the controller class.
    public ActionResult Car()
    {
        List cars = new List();
        cars.Add(new Car { make = "Ford", model = "See-Error" });
        cars.Add(new Car { make = "Mini", model = "Copper", favourite = false });
        cars.Add(new Car { make = "Tesla", model = "X Dual Motor", emissionFree = true });
        return View(cars);
    }
View
These are the Web Pages. They are found in the Views folder and have the extension of
cshtml. So lets look at the default home controller class and you can see that we have
standard 3 actions. These are Index, About and Contact. (Plus our new Cars Action.)
    public class HomeController : Controller
    {
        public ActionResult Index()
        {
            return View();
        }

        public ActionResult Car()
        {
            List cars = new List();
            cars.Add(new Car { make = "Ford", model = "See-Error" });
            cars.Add(new Car { make = "Mini", model = "Copper", favourite = false });
            cars.Add(new Car { make = "Tesla", model = "X Dual Motor", emissionFree = true });
            return View(cars);
        }

        public ActionResult About()
        {
            ViewBag.Message = "Your application description page.";

            return View();
        }

        public ActionResult Contact()
        {
            ViewBag.Message = "Your contact page.";

            return View();
        }
    }
Here I have created a new Action. If you right click on
the name of the Action "Car" and select Add View, then you can easily create one. Select
MVC and enter. Next use the view name and at the next box, List and the Model type of Car.
Add and a new view is created with the rendering already created. This is a good starting
point for creating your page of cars.
If we open the Car view (Index.cshtml), then we get a part of the html page. The first
thing you see is the "view bag"
    @{
        ViewBag.Title = "Home Page";
    }
This ViewBag object can have any property you want, but don't over use. This 'Title'
property is used in the 'Master' page. The rest of the html is the data we want to put
on the screen.
So where is the master page? It is under the Views folder in the Shared sub folder and
called _Layout.cshtml as below.
NEED TO ADD AN IMAGE HERE!!!!!!!
You can see all of the common headers, navigation and footers. These can be changed to any
thing you like. The Index.cshtml from above is Rendered and you can see above "@RenderBody".
So what is Rendering?
This is the way in which C# mixes code with the html at the server side. The "footer" has
the code @DateTime.Now.Year that in C# gives the current year. On the web server, you can
see the code, but from the client browser, you will just see 2022, or whatever the current
year is. All code to be rendered starts with an "@". C# is clever enough to know where the
end is.
Controller
Controllers are for the routing. They control which views you see.
The result is always a View. The Views are web pages and are found in the Views folder.
We have seen the car object being populated in the index action.
The default routing is found in folder App_Start and is called RouteConfig.cs. This should
be left alone, but it is userful to understand what it does. See below.
    routes.MapRoute(
        name: "Default",
        url: "{controller}/{action}/{id}",
        defaults: new { controller = "Home", action = "Index", id = UrlParameter.Optional }
    );
The url is broken into 3 parts. The first is the controller and this is the name of the
controller. So as we have the HomeController, the url = \\Localhost\12345\Home.... The
next part is the Action. In the controller we have the Index, Contact and About. So the
the url for Index action will be url = \\Localhost\12345\Home\Index.
If we look at the default, then if no controller, default to Home, if no Action, then
default to Index and Id is optional. So if you do not specify Controller or Action, then
the \Home\Index page will be used.
Other topics
Bundling: This is for grouping scripts. Rendered using
@Scripts.Render("~/bundles/jquery"). The "~" character defines the root. The bundles are
under App_Start
Stop the yellow wall of death: This is the screen that tells everyone what the code is,
the program stack and lots of other things you want hackers to not know. Under WEB.Config
there is a way to do this in VS2017. I'm using VS2019, so will have to do a bit of
searching.
Location of _layout.cshtml: This is in View folder, Shared sub folder and called
_ViewStart.cshtml. This just contains a render statement.
    @{
        Layout = "~/Views/Shared/_Layout.cshtml";
    }
Deploy: Right click on the project and select Publish. This will create att the files
required for you to copy and paste the files in \bin\release.