API's (for .Net framework)
This page is for the real basics for writing an API in C#. It will have hints and exampes to make the creating and understanding easy. (And remind me of what I'd forgotten).
Home | Applications | Documentation | Transport | Personal |
API's (for .Net framework)
This page is for the real basics for writing an API in C#. It will have hints and exampes to make the creating and understanding easy. (And remind me of what I'd forgotten).
Creating in Visual Studio
Follow these simple steps
Log into Visual Studio (I am using VS2019 here)
Create new project
ASP.Net Web Application (.Net framework)
Give your project a name
Select Web API and leave MVC and Web API ticked
Press 'Create' and it's done.
The Controller
For API, we will ignore the MVC stuff and the HomeController. API's use the ValuesController.
This class has the basics in it for you to start with.
          public class ValuesController : ApiController
              {
                  // GET api/values
                  public IEnumerable Get()
                  {
                      return new string[] { "value1", "value2" };
                  }

                  // GET api/values/5
                  public string Get(int id)
                  {
                      return "value";
                  }

                  // POST api/values
                  public void Post([FromBody] string value)
                  {
                  }

                  // PUT api/values/5
                  public void Put(int id, [FromBody] string value)
                  {
                  }

                  // DELETE api/values/5
                  public void Delete(int id)
                  {
                  }
              }
Default Routing
The default routing can be found in
App_Start
WebApiConfig.cs
See the example below that shows the standard end point.
            config.Routes.MapHttpRoute(
                name: "DefaultApi",
                routeTemplate: "api/{controller}/{id}",
                defaults: new { id = RouteParameter.Optional }
            );
URL for testing
The simple way to test this is to start debugging from Visual Studio. You can select the
browser you want to use from the drop down list.
The browser will launch using local host. i.e. https://localhost:44338/
The 'API' option below the URL gives you examples of the URL's for the methods
GET ALL = https://localhost:44338/api/values
GET ROW = https://localhost:44338/api/values/2
For the POST, PUT and DELETE, you need data in the Web Request body. Postman is a good piece
of software for this.
Adding additional routes
You can add additional routes to the controller class. This means you could, for instance,
have another GET command that returns different information. The example below is for my
Countdown Numbers program. It also shows how you can pass multiple parameters to the API.
This would be better to add the body, so it's just an example.
            // GET api/countdown numbers
        [Route("api/values/countdownnumbers/{number1:int}/{number2:int}/{number3:int}/{number4:int}/
                                            {number5:int}/{number6:int}/{target:int}")]
        [HttpGet]
        public string countdownNumbers(int number1, int number2, int number3, int number4,
                                       int number5, int number6, int target)
        {

            CountdownNumbers cn = new CountdownNumbers();
            cn.input1 = number1;
            cn.input2 = number2;
            cn.input3 = number3;
            cn.input4 = number4;
            cn.input5 = number5;
            cn.input6 = number6;
            cn.target = target;
            return cn.Solve();
        }
If you run this from the browser with the parameters then...Postman
This software is free and easy to use. One of the nice things about it is that it remembers
all of your messages. The other good bits are that the message body can hold data in JSON,
XML, Raw etc...
Download it and play.
Firstly we will start with the 'GET ALL = https://localhost:44338/api/values'
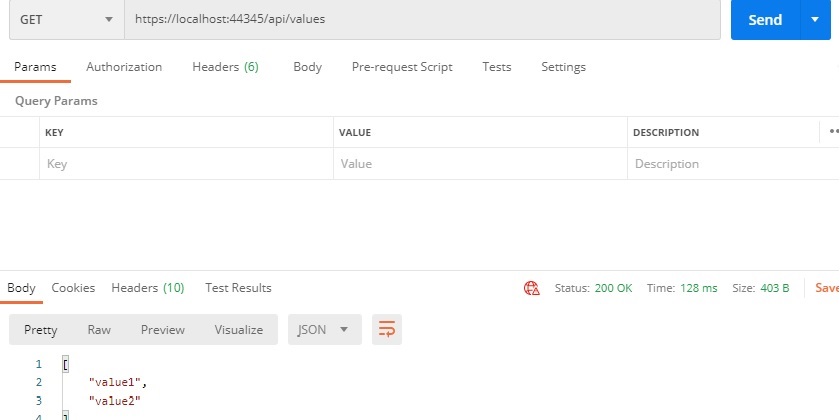
This shows the GET statement and the url at the top and the result at the bottom.
If we now user the example from the countdown numbers then we get the results from the
CountdownNumbers Solve method. The command (GET), url and results are highlighted in Red.
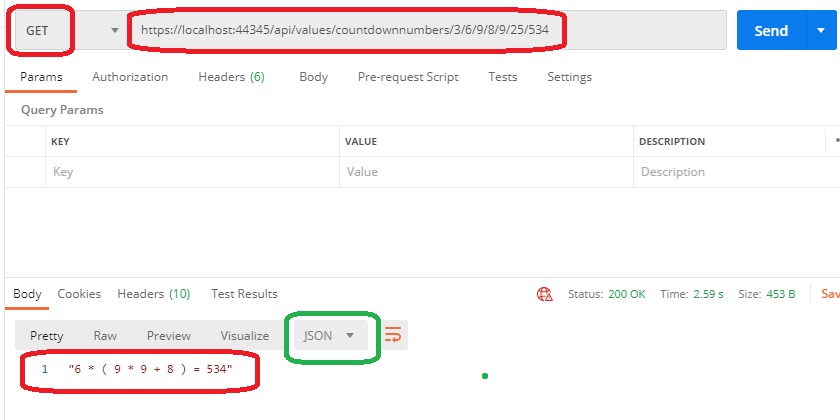
You can look at the results in XML, JSON, TEXT and many other formats (Highlighted in green).
Please note that the left hand pane does show history. This is one of the really useful
feature of this program.
Publish
OK, I have an API and I want to use it in IIS. The publishing is easy.
Right click on the solution and select Publish...
Select Folder
Add path (I used C:\Users\David\source\repos\API_Documentation\Test IIS Location)
Click 'Publish' and that's it. If you go to your folder, you can select everything and
copy this to your IIS server and use.